Have you ever wondered how to master a song in FL Studio?
Mastering has always seemed like a strange, mysterious thing to me.
I wanted to figure out a way to simplify the process as much as possible, so that I could master a song in FL Studio, all with plugins that are readily available.
It may seem like a bit of unicorn, but I believe it is possible.
And I’m going to show you how to do exactly that.
LEARN TO LOVE THE LEARNING PROCESS
I am by no means an expert. I’m just getting started in this journey of learning how to master my own music. But it is rewarding to learn how to do something that you have found to be strange and hard.
I love the process of digging in, learning from others who have gone before me, and then sharing that experience with you. Hopefully to shortcut the way for you to get to mastered tracks that you can be proud of.
I want to release a lot of music.
So to that end, the more that I can figure out how to do on my own, the more music music I will be able to release.
I don’t know about you, but I don’t have an infinite budget at my disposal, so being able to learn a skill that keeps me from having to pay someone else from doing it for right now seems like a great idea.
And I just love learning new things. I’m a nerd like that.
So let’s get right into this.
I went out and found a great tutorial video on this process.
It was by a dude named Asher Postman. He works mostly in the Pop/EDM category, but I found all the process he talked about to be useful and pretty clear.
And I am basically breaking down what he taught, and how I did it with what he showed.
So I’m going to break his process down into 5 basic steps:
- Exporting your track
- Setting up a new project
- Subtle EQ Moves
- Using Maximus plugin
- Using YouLean to help finalize the song
Exporting your track to master
The first step in this whole process is to get your track that you finished mixing exported.
What that essentially means is that you are bouncing all your recorded tracks down to a stereo track so that you can then process it separately.
Why would you want to bounce everything down?
Well, for me, it’s mostly about saving processing power in my computer.
Once you have bounced down your mix, you have essentially printed all the eq, compression, effects and automations onto this stereo track.
So when you set up a new project with this track, there is nothing in your mixer.
So now your computer’s resources are free to focus on making some of these final adjustments to the mix, making your track sparkle and shine.
There is also something else that you can do in FL Studio at this point as well that I think is amazing, but I’m going to save that until later.
So what’s the right level to bounce everything down to?
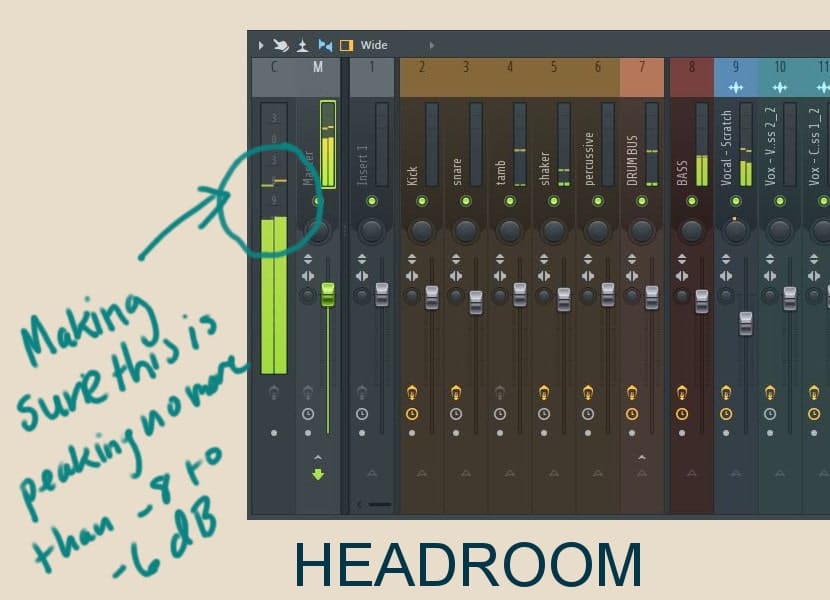
It can be kind of confusing when you read a bunch of different material on how much headroom you need for the mastering process.
I like to give myself about 6-8 dB of headroom to work with.
That means that as I’m looking at my final mix before exporting, I’m checking out the loudest parts on the song, watching the master track to make sure that I am seeing that 6-8 dB of headroom.
So what if you aren’t getting that?
Well there are a couple of things that you can do:
- Lower the volume of each of the tracks, mix it to a lower volume overall
- Bus everything to another track, and then use a Gain tool to lower the track
I find the second method to be a little easier, especially if you are dealing with a large number of tracks.
Word of caution: if you are using buses already for groups of instruments like drums, background vocals, etc. Make sure that you send the buses to the new submix channel, not all the channels. You’ll end up doubling up volume on those groups when you do that.
Not that I’m speaking from experience or anything … 😉
SETTING UP THE MIXER
So go to the mixer window in your project by pressing F9 on your keyboard.
Find an empty channel
Bring it to the front of the mixer, by holding shift and using the mouse scroll wheel.
Press F2 to bring up the rename dialog box.
Name the channel SUB MIX.
Choose a color and an icon if you want to.
Now select each of the channels that you have already mixed, or the buses if you have those.
You can select multiple channels in the mixer by holding down CTRL + SHIFT as you click on the channels.
Once you have them all selected (highlighted in green), right click on the arrow at the bottom of the SUB MIX channel, and select Route to This channel only.
This breaks the link between those channels and the Master Fader, and puts SUB MIX between them. So now the routing goes:
Channel -> SUB MIX -> MASTER FADER
This gives you the ability to affect all those channels you routed as a group, before it goes to the MASTER Fader.
Select the SUB MIX channel.
Go to the right side and select the plugin called Fruity Balance.
This plugin has some panning features in it, but it also has a gain feature as well.
We’re going to use the gain to bring the level of the entire mix down, until we are hitting that desired 6-8 dB of headroom.

It’s nice because you have lowered all the volumes together.
Now if you are having to do a major amount of gain reduction here, your mix might start getting out of whack.
So make sure that you are listening to each of the sections.
You may have to go back and adjust some channels to get the balance right again.
This works best when you just need a little bit of a change in the overall volume.
So keep that in mind.
Alright, so now we are getting the 6-8 dB headroom that we want.
So save the project. You can do a save as, so you don’t lose your original mix.
Then do an export, as a WAV file.
This will be the track that we take into the mastering process.
Make sure you know where you exported the file so that you can find it here in a second when you set up a new project.
SETUP A NEW PROJECT
Create a new project by selecting File -> New
Add a new audio track.
Click on the audio track to bring up the dialog box.
Go to the file section and click on the folder icon.
This will open up a file explorer window so you can go and select the exported WAV file that you created in the last step.
Now route this track to the first channel in the mixer window.
And then you are going to add in two plugins on this channel:
Parametric EQ 2
Maximus
SUBTLE EQ MOVES
Open the Parametric EQ 2.
Your goal here is just to make slight adjustments to different areas of the song, where you feel like things need to be addressed.
It might mean you add in a little more top end by slightly boosting the final shelf band.
It might mean taking out a little bit of the harsh mids.
This is all subjective. The idea is to make these small, subtle moves that hopefully enhance good qualities and downplay less desirable qualities in the song.
The key is small and subtle. I’m talking no more than about a dB of movement one way or the other.
If you are finding that you are having to make larger moves than about 1 dB, you might want to consider going back into your original mix and making some more adjustments on particular instruments or sounds.
Again, to beat the already dead horse, small and subtle moves are the key in this step.
Always turn the plugin off and on to see what kind of a difference you are making.
If it is not improving the sound, then you are not doing something right.
But one thing I almost always do is to create a rolloff on the bass end of the spectrum.
I create a rolloff around 30 Hz. This gets rid of some serious low end problems that you may experience in a live sound environment.
So, let’s move on to Maximus.
FL STUDIO MAXIMUS
This plugin is a funny beast.
It looks super complicated when you open it up, and it can feel really intimidating. But it really is fairly simple.
You have 4 basic areas that you are affecting with this plugin.
You are defining 3 sections of the frequency spectrum of your song. That’s a fancy way of saying you get to define what bass, mids, and highs are in the song.
Then you get to affect those 3 bands individually. There are some tools that you can use on each of the bands. You have gain, compression, and stereo widening.
There are more tools than that, and you can read in depth about all the controls available in Maximus, but those are really the things that we are going to focus on for this tutorial.
And then there is a final 4th area, MASTER: which affects the entire song, all the bands combined.
This is where we are really going to set up the limiting for the song. And make sure that we are getting to commercial loudness without creating any distortion or unpleasant effects in the song overall.
Let us begin…
DEFINING THE BANDS
Go to the right side of the plugin window and click on the BANDS section.
This will then bring up three colors on the window section of Maximus.
The red section is what we are defining as the bass, the orange is the mids, and yellow is the highs.
As you move your mouse over the right edge of the red section, you will see it turn into a cross.
Then you can left click and drag the side to the frequency that you want to define as the end of the bass section.
Make sure that you select LOW on the left side of Maximus.
Now you can click the solo button at the bottom as the song is playing, and you will be able to hear what you have selected to be the bass band.
As the song is playing and LOW is still soloed, you can move the right edge of the red section around until you like what is falling into that low section.
Now you can do the same process with MID and HIGH, until you have everything sitting where you want it to be.
SETTING UP THE GAIN FOR EACH BAND
Now that we have defined each of the bands, take Maximus out of the SOLO mode.
We’re going to mess with the gain settings now.
The whole reason that we created the WAV file with the headroom, was so that we could have some flexibility at this point.
To start affecting the gain you do it two ways:
Directly click and drag on the band colors in the window
Or choose each band individually and use the PRE knob to increase the gain.
I generally use the first method and click and drag on each section.
I like to pull them up a little bit at a time. Making sure that you are messing with all three, rather than just jacking the BASS way up. That will skew the way that you are hearing the song.
So mess with each one. Slowly raising the level.
I like to grab ahold of one of the levels and slowly raise it while I have my eyes closed, that way I’m relying on my ears and not on the tool itself.
You’ll go through and adjust each band up, and then do it again.
Eventually you’ll get it to a point where things sound pretty good.
I like to loop the loudest section of the song while I’m doing this.
This will help me see if I’ve pushed any band too far pretty quickly.
The idea is to bring the loudness up, but not to push it to distortion.
I’m always watching the Master fader on my mixer as well, to make sure that I am not pushing up past 0 dB.
When you finish this process, you’re track will be louder and you probably won’t have evenly raised the level of each of the bands. And that’s okay.
USING COMPRESSION ON THE BANDS
This one was not as obvious to me when I started using Maximus.
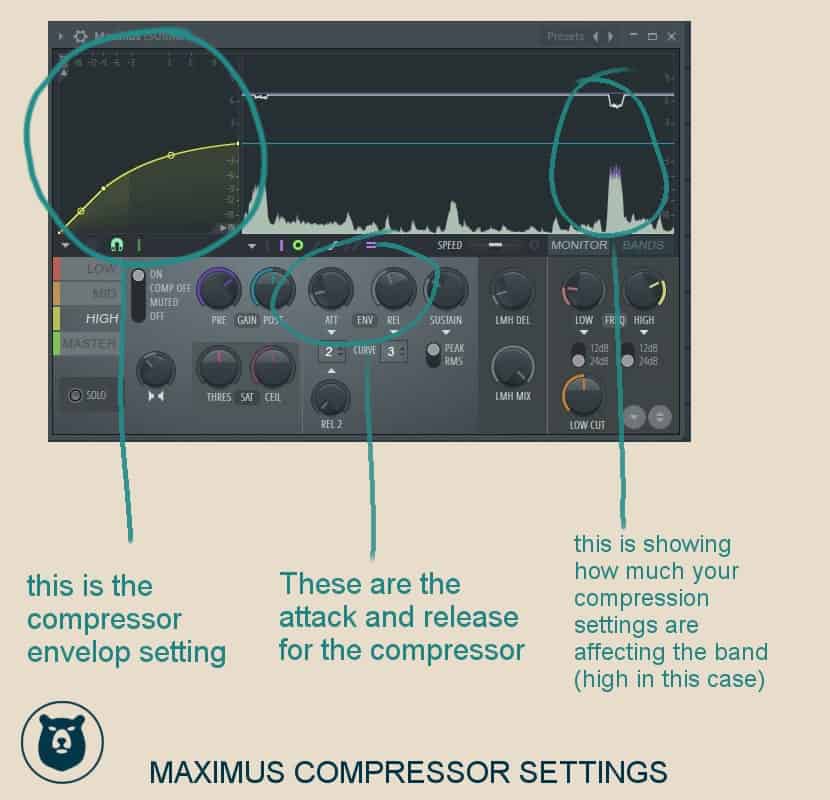
So each band has its own compressor.
You set the compression using the graph tool that is on the left side of the window. And then there are the normal knobs that you are used to seeing on a compressor for attack and release.

So now what you can do is press the monitor button that’s on the right side of the Maximus screen.
This will let you see the portion of the sound that you are affecting with the compressor.
START WITH THE LOW BAND
So start with the LOW Band.
You don’t have to be in SOLO mode for this. In fact you don’t really need to be at this point, because you want to hear how the compressor on each band is affecting the entire mix.
And at this point, you are looking to do subtle moves with the compressor.
You’ll see a line that is running from the top right to the bottom left of the screen on the left.
In the default position, the dot is in the middle. This 1:1 compression, which means nothing happening.
As you move the dot down that line though, you’ll see another green line on the right side monitor window that starts to move.
This is where the compressor is becoming active.
Moving the line down means you are affecting more of the audio.
And you’ll be able to see the parts that are being affected. Make sure you are in MONITOR mode, not BANDS.
You’ll see dips in the graph of the right showing you how much of the signal is being compressed.
You can select which band you are affecting with the compression, choose either LOW, MID or HIGH, and then set the the compression level.
Pay attention to how much you are compressing here.
You probably don’t want to do more than about 2 dB.
Set your attack at around 2 ms. And set your release at around 45 ms.
This is a good starting point. From there you can tweak it to your liking.
Then you want to do the same thing on the MID and HIGH Bands.
Once you have everything balanced out the way that you want it to sound we’re going to move on to getting it louder.
LIMITING THE SONG
So now click on the MASTER section of Maximus.
First set the threshold knob of the saturation section to 1%. You’ll see the value in the top left of the FL Studio window. Turn the knob slightly to the left and you’ll see the percentage you have set.
Then move to the CEILING knob. Set this at either -0.1 dB or -1 dB.
This setting is a hard cuttoff for the track. So anything that spikes above this point will be chopped off.
This makes sure that your track never goes above -0.1 dB or -1 dB.
This keeps your track from moving into digital distortion.
You don’t want digital distortion. It’s ugly.
So from now on you will be focusing on the post gain knob.
You will raise this level as high as you can go without hearing any distortion.
So the weird part about this is that you are pushing up the overall level of the song to where parts of the song are being clipped, but it’s being clipped without it having a nasty effect on the song overall.
Go to the loudest parts of your song for this, and as you raise the post gain, listen to make sure that you aren’t hearing any distortion.
If you do hear distortion, then back down the POST gain knob until the distortion is not present.
This is going to raise the volume of the song, but it also does some limiting as well.
You want to balance it to where you are getting it as loud and clear as you can, without distorting the sound.
YOULEAN METER
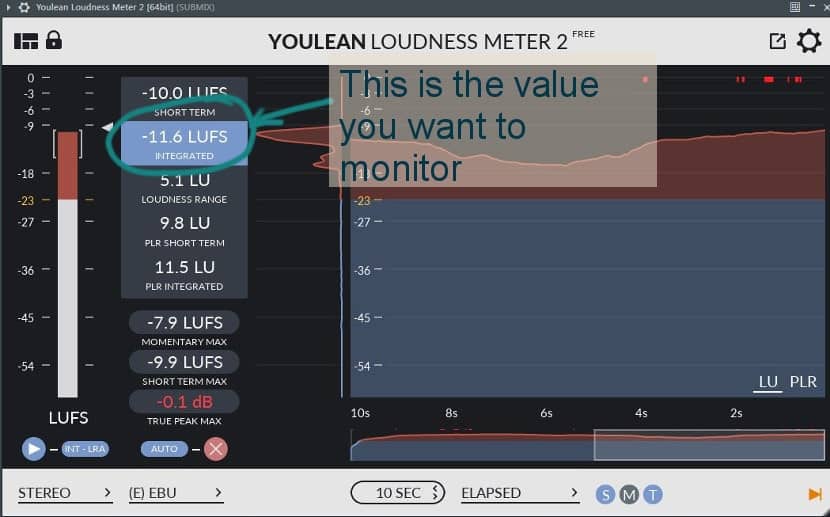
This is where the YouLean meter can come in handy.
This is a free plugin in that is available online at Youlean.co
Open it up and put it beside Maximus as you are doing this final stage of adjusting the post gain.
I actually ended up shooting for a level of around -11 to -10 LUFS as I monitored the YouLean Meter.

That’s what worked with the song I was working with.
You can adjust this to whatever makes the most sense for your song.
And that’s really all there is to it.
Here are the examples of the before and after :
BEFORE
AFTER
So the song got louder and hopefully clearer through the process, and what we are left with is a song that is at a commercial loudness level.
CONCLUSION
So now that you have read this, hopefully it’s taken a little bit of the mystery and intimidation out of mastering. This is not exhaustive, but I think it’s a great starting place to understanding how to go about mastering in FL Studio with plugins that you already have.
So let’s go back through the steps:
- Export the master from the mix that you want to work on with enough headroom (6-8 dB)
- Setup a new project in FL Studio
- Start with EQ, doing small adjustments
- Move on to Maximus
- Finally work on the overall level utilizing the LUFS tool
This is not the only way, but I think it is super helpful to be able to work through this and get results that you can be proud of!
I again want to say thanks to Asher Postman for creating a great primer on mastering in FL Studio. I’ve learned a lot by watching him, and hopefully you’ve learned something too.
If you would like to learn more about mixing and mastering in FL Studio, be sure to sign up for the newsletter. And a bonus, when you sign up, I will send you a template with all the plugins pre-loaded and the routing in place to let you get straight to work mastering your track.
BONUS
Now that you have finished mastering the song, let me show you how you can create a custom video that you can put out on YouTube, right from FL Studio!
