
So you want to figure out how to record electric guitar on your computer?
Well, let me walk you through the way that I go about it.
I promise you it’s not the only way. And it’s not necessarily the best way.
But it gets the job done. And it gets it done fairly quickly.
And I’ve been able to get some pretty good results from it.
I will be showing you the equipment that I use to make this happen. And then walk you through setting it up and recording your takes.
It just takes three basic steps:
- Setup your guitar and audio interface
- Load in a guitar amp and effects plugin
- Record directly to the playlist.
Read on if you want to see one way to record electric guitar on your computer.
WHAT YOU WILL NEED
Here is the list of things that you will need to follow along with my example.
- Your electric guitar – I’m using a Telecaster in this example
- Instrument cable – I have a fender guitar cable
- Audio interface – I’m using a Presonus AudioBox iTwo
- Guitar amp/pedal plugin – I’m using Native Instruments Guitar Rig
- DAW – I’m using FL Studio Producer Edition
SETTING UP THE GUITAR AND AUDIO INTERFACE
We have to get the first couple of bits into place in order to start laying down some awesome guitar tracks.
So get the ¼” cable, your audio interface and the computer all hooked up.
Open up your DAW of choice.
My choice of DAW for this example is FL Studio.
And if you want some reasons why I chose FL Studio as my DAW, you can check out this article on my Top 5 Reasons.
Next I’ll open up the mixer window in FL Studio. You can access this with the shortcut key of F9.
Now pick an empty track. And go to the right side of the mixer.
You’ll see the drop down menu that is above the Slot 1, Slot 2, etc, is the Audio Input source selection.
You’ll want to pick the channel on your audio interface that you plugged the guitar into.
When you do that, you should start seeing some signal coming in on the channel when you strum your guitar.
It probably won’t be very loud, but we’re going to fix that.
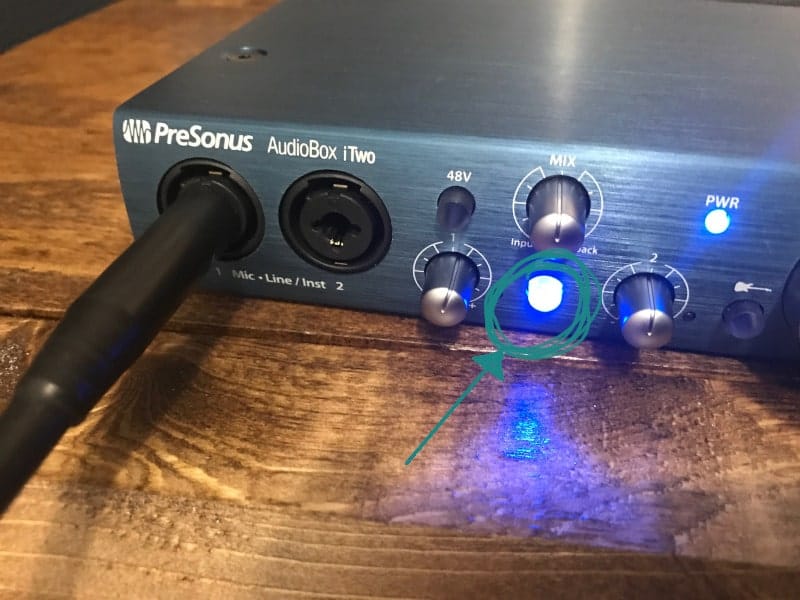
GETTING SOME EXTRA GAIN
Most interfaces have a feature where you can add some gain into a channel with low signal level (like instruments that you plug in with ¼” cable).
And I’m not just talking about the gain knob on the front of the audio interface.
I’ll show you what I’m talking about with mine.
On the front, there is a little icon that looks like an electric guitar. It has a button right below it.
If you push that button in, you are giving yourself a little extra gain for your instrument.
Pretty sweet, huh?
Some other interfaces might actually have a digital option that you have to select in order to get the extra gain.
So you’ll have to check for your specific model to see what the option is.
But now when you play your guitar you should hear a louder sound than what you did before.
This is because that button (or digital option) has given you some extra gain to work with.
So now let’s get some guitar tone going.
WHAT YOU USE TO CREATE YOUR TONE
To make life a little easier, I’m showing you a way to create your guitar tone digitally.
The purists out there right now are shaking their hands and covering their mouths in shock.
But here’s the deal.
Most of the time when you are starting out, you want to be able to try out different tones and experiment with amps and effects, etc.
If you were to try to buy a really nice tube amp, high grade pedals, and all the cables, mics, etc to get the sound back into your computer, it would probably cost you several thousand dollars. And that would only give you one really good amp, and some nice effects pedals.
But, for the price of about one really nice guitar pedal, you can have simulated versions of a 100 or so amps, slew of pedals, rack effects, studio simulations, etc.
So that gives you a lotta bang for the buck. And while it’s not as true and pure as real gear, you can get a feel for the kind of amps you prefer, and the effects chains that you like.
Big win.
I am using Native Instruments Guitar Rig 5 for my setup.
But there are a lot of other options as well. You can look at Amplitube Max, or Bias Guitar Essentials. Most of these packages will run you somewhere in the neighborhood of $200-$250.
Just make sure that you get a package that has both the amp simulations and the effects simulations.
So let’s load this plugin into the effects rack.
LOADING UP THE GUITAR AMP
If you just installed the plugin, you may need to rescan your effects and add it in to make sure that FL Studio sees it.
For this example I will assume it is already loaded in. But if you need a little more help with this, I have another article that shows you how to load up your new plugins.
In my case I’m going to load up Edison in effects slot 1 on the channel.
And then load in Native Instruments Guitar Rig into Slot 2.
Why did I load edison first?
That just give me more options. By loading edison first, I can essentially record a clean version of what I play on the guitar with no effects. This can be really useful later when you are mixing your song.
It will allow you to explore other effects that you could use.
So once you have the plugin loaded up, you need to select the tone you want.
To get this tone, you put together a combination of effects pedals and guitar amp.
LOADING IN SOME PRESETS
If you are not sure where to start, just start looking through the presets.
To access some of the presets you you can go into a menu, like Styles.
And then select the style of music you are playing.
I’m going to pick blues. When I do that, it narrows down the preset options below that.
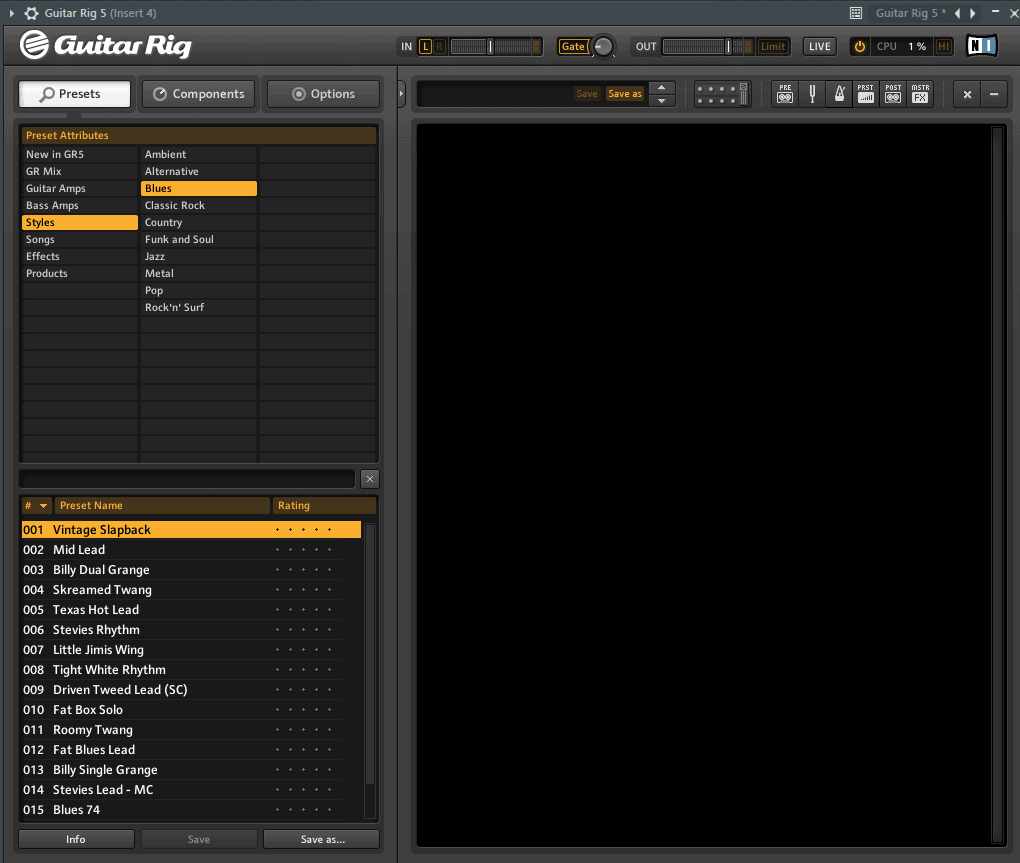
I’ll select the preset 001 Vintage Slapback. Double click on it, and it will load up all the effects and amps on the right side.
You don’t have to stick with this, but sometimes it’s nice to have a starting point to start changing things to what you want them to sound like.
TWEAKING TO GET THE SOUND THAT YOU LIKE
The beautiful thing about a plugin like Native Instruments Guitar Rig, is that you have all kinds of options you can choose from.
You could choose to do something as simple as adjust the knobs on the pedals and amps that are setup on preset.
Or you could take away certain elements that you don’t like about the sound.
Or you could add in something completely different.
So let’s look at how you add in different elements in Native Instruments Guitar Rig.
You have decided you want to move beyond basic presets into a world of crafting your own sound.
ADDING YOUR OWN COMPONENTS
Let’s start by selecting the COMPONENTS option at the top left of the screen.
When you do that, a new menu is going to appear.
You’ll have options like amplifiers, cabinets, distortion, etc.
If you have ever played with a live rig, this is basically like setting up your pedal board and signal chain.
But you now have hundreds of options instead of just a few.
If there are elements that are already loaded, they should be visible on the right side of the window.
IF you want to start with a clean palette, you can click the X in the top right corner.
That will get rid of everything that is loaded in there right now.
An amp is a great place to start with crafting your tone. Because each amp has a distinct tone and is a big part of shaping the overall sound.
To make the selection you can either double click it, or you can left click and drag it to the right side of the window.
This will cause the amp will show up, and you can start to tweak the sound.
You can then go into another category like distortion, and grab a pedal, like “Skreamer” (which is an emulation of Tube Screamer) and add it.
You can move around order of the elements by left click, hold and drag to the position you want it to appear.
If you want to remove something completely, you can left click and drag it out of the window and it will be removed.
SAVING YOUR CUSTOM TONES
Let’s say you’ve finished crafting a tone masterpiece.
Well, you can save your creation for later.
Click on the Save As button in Guitar Rig.
Then name it what you want.
Now let’s record that guitar part!
RECORDING GUITAR IN FL STUDIO
You should still have the mixer window pulled up here.
Right click on the record button on the track you have Guitar Rig set up in, which is right below the clock icon.
When you right click on this it will open up a window where you can choose where you want to save the audio file you are about to record and what you want to name the file.
Don’t worry, it won’t start recording yet. You are just “arming” the track.
You’re basically letting FL Studio know that you are about to record some audio.
So let’s get the playlist and transport options set up so we can records.
Right click on the record button on the top transport controls.
Make sure that Audio is checked under the Record Filter section of the options.
And also make sure that you click on the SONG button, next to the play button on the transport controls.
This will allow you to record directly into the playlist.

If you like to record with a metronome, make sure that you click that button.
It looks like a wand and is located right next to the BPM setting for the song.
Open up the playlist window by clicking F5.
And then press record.
And you are off to the races with recording guitar.
Once you have finished the take, you can press stop.
And you should see the audio file appear on your timeline in the playlist window.
Pretty sweet!
CONCLUSION
So that’s how I usually end up recording electric guitar on my computer. This is by no means the only way.
I just wanted to show you that it doesn’t have to be overly complicated, and you can get by with relatively low amount of gear and plugins to make it work.
So let’s recap.
The equipment you’ll need:
- Your electric guitar
- Instrument cable
- Audio interface
- Guitar amp/pedal plugin
- DAW
I showed you how you can:
- Set up a channel to run your electric guitar through
- Set up the plugin to get the tone you want
- Record directly onto the playlist
I used Native Instruments Guitar Rig 5 and FL Studio.
You may have something different, and that’s okay. But the basic principles are the same.