Maybe you have just purchased an audio interface, or are thinking about purchasing an audio interface. You might be thinking to yourself, I wish someone had explained what all those audio interface outputs are for. Well today, we will complete the audio interface outputs explained challenge!
If you are anything like you me, you scour the internet for all the information you can find so that you can make the best purchasing decision.
I don’t like to be hasty with money.
I want to buy something that that is good quality, that will last for a long time, and has the potential to grow with me as I progress in music production.
*NOTE – if you want to see how I produce music and what I use, you can check the FREE course out.
[thrive_leads id=’679′]
When you are doing your research on audio interfaces, you have probably looked through the pictures of the unit you are considering on sites like Amazon, Sweetwater, Front End Audio, Vintage King, or some other online store that carries the interfaces.
Different Output Options
On each interface, chances are you saw some different options when you looked at the photos of the device.
You may have seen quotes of “this audio interface has 18 inputs and 20 outputs”.
But when you look at the photos of the back, it doesn’t seem like the number of outputs or inputs lines up to what they’ve quoted in the spec, and you’re left scratching your head, wondering:
How does this audio interface actually have 20 outputs?
Overview of 7 basic outputs on an audio interface
So we’re gonna dive into a list of the audio interface outputs. We’ll talk about how they all work, and what they are used for.
So let’s start with a picture a list … I’m a visual person, so it helps me to be able to see images and correlate it to the function etc..
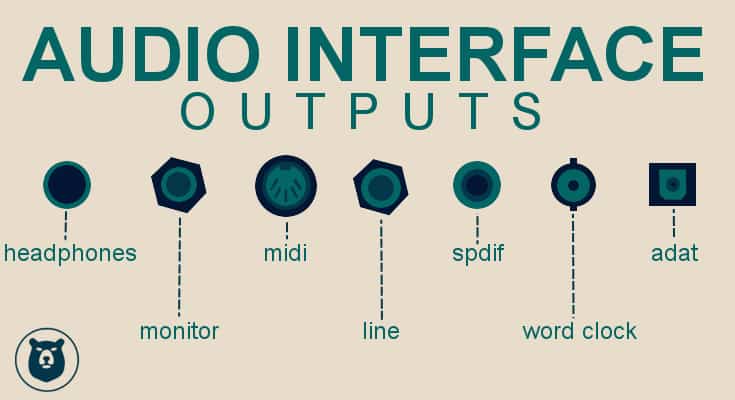
- Headphone outputs
- Monitor outputs
- MIDI output
- Line outputs (balanced and unbalanced)
- SPDIF
- Word Clock output
- ADAT/Lightpipe/TOS Link
Let’s start with the easy ones:
Headphone Outputs
This is probably the most obvious one, but this output will usually send whatever is on the master channel of your digital audio workstation (DAW) to your headphones so that you can listen to the mix.
It’s helpful when you have only the headphones output turned up and the monitors turned down when you are recording, so you can avoid the nasty feedback.
And also avoids getting some weird echoes in the things that you are trying to record through a microphone.
It’s also convenient when you are working with a vocalist to have them to hear the track that they are singing to as well.
Maybe you create a small mix of their voice with some eq and reverb to help them feel confident about what they are doing.
Most vocalists are self-conscious when it comes to hearing their own voice in headphones without any effects.
So something to consider is whether the audio interface that you are considering has more than one headphone output.
There are some other ways around this, by using a separate pair of line outs to send as a mix to the vocalist. Or another instrumentalist that you are recording through a mic.
Monitor outputs
Pretty much every interface is going to have some form of monitor out setup.
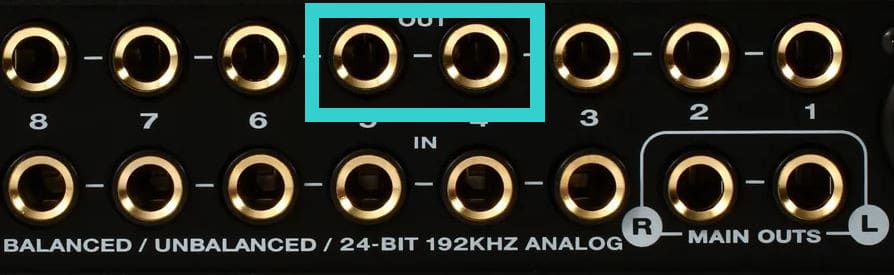
Most of the ones you will find will have ¼” outputs that are intended to be fed into either powered studio monitors directly, or to an amplifier and then to passive studio monitors.
The more common route is powered studio monitors, and most of the studio monitors that you will see on most of the major online stores will be powered monitors.
On the back of the audio interface the monitor outputs will be marked as monitor, or main out, and then have a L and an R to show you which line is meant to go to the left speaker and the right speaker.
But you will have some of the smaller audio interfaces, like the Focusrite Scarlett Solo, that has RCA outputs on the back rather than ¼” outputs.
I’m assuming that this would be for someone who would want to send their sound to a regular home stereo setup or maybe to some consumer grade speaker setup.
I’m honestly not sure why you would want this to be your option for monitor output, but that’s just me.
MIDI Output

If you are around music production for any amount of time you are likely to hear the phrase MIDI. Basically it is just information that is transmitted either to or from a device that has the MIDI capability.
The basic kinds of information would be what note was played, how hard it was played, how long it was held, etc.
The most common version of this is a midi keyboard. You hook up a midi keyboard to your computer, and then you can play some of the virtual instruments.
But all of this MIDI information that you create and save on a computer, can be repurposed in other ways too.
You could have created a piano part on your computer, but maybe you decide that you want to use a sound on an old synth that you have. Well you can use the MIDI output to send all that information to your synth. And that’s just a basic function.
You can get really elaborate with MIDI information, to the point that you can control lights and slides, and all kinds of other gear, but that’s a story for another day
If you are a super nerd, you can read about the history of MIDI from this wikipedia article, which is kind of interesting to, because I am a little bit of a nerd. But back to MIDI outputs.
The basic functionality of a MIDI output to send control information out to a device: a synth, a module, or something that has midi input capability.
LINE OUTPUTS
Line outputs are a funny beast.
When I first got into music production I had no clue what all those ¼” outputs could possibly be used for, and it seemed a little intimidating and a little overkill.
So I just kind of ignored it for the first couple of years of doing my own recording and mixing.
But then I started realizing that line outputs open up a world of possibilities to you. I’m just going to mention a few right now, just to keep my head from exploding.
You could use it to connect in a different pair of studio monitors.
Use it to send a specific kind of mix to a person that you are recording.
Or use it to send audio from your computer to some external gear for processing.
A Different Pair of Studio Monitors
So let’s talk about the obvious one: hooking up another pair of studio monitors.
Now some people might say that’s a waste of your audio interfaces real estate. And there are dedicated pieces of equipment that can help you set up different sets of speakers.
But when you are starting out, you use what you have. And as you improve your skills you typically buy some more gear. So save the purchase of another piece of gear for later.
A Different Mix
So let’s say that you are working with a vocalist.
You bring them into the studio and you set them up to record.
For you, you probably want to get the cleanest, driest signal you can.
This is so that you can do all sorts of fun stuff to the audio after you have recorded it.
But the vocalist is not too keen on hearing themselves in such a raw and unpolished way.
They ask you if you could put some delay and reverb on the track. They want to get a feel for how it is going to sit in the mix.
You could setup a separate mix that has the effects on the vocal.
And then send that out to a headphone amp for them, all while you are recording just the dry track.
Everyone wins.
Sending audio to an external piece of gear

This is probably one of my favorite uses for a line output.
Let’s say you got a sweet new hardware compressor, and you are dying to try it out.
Chances are you probably have some tracks that you have already recorded. Let’s say you have some electric guitar parts that you think would benefit from running through the compressor.
You can set up in your DAW to have that mixer channel go out of the line output on the back of the audio interface.
And then route that channel(s) into the compressor.
And then come back in to your DAW. So basically you have just sent your audio through the compressor and back to your DAW thanks to the beautiful line outputs that you have.
And it could also work with sending out to other things.
Like an effects pedal, or even a guitar amplifier.
For routing into the guitar gear, you need something called a re-amp box, they are pretty simple, but useful.
SPDIF
This is similar to the line out, it’s just a specialized version of the output, a digital format.
There are some pieces of external gear that have these SPDIF ins and outs built into them. Those ouptuts let you send a stereo pair out of your interface and then back again.
There are a few compressors, and preamps, etc that have SPDIF outs and ins available.
It’s just another output tool in your shed that you can use to level up your music production game.
Word Clock
When you start really ramping up in your music production sometimes you need to bring on some extra gear that will be interfacing with your audio interface (how meta is that?!).
In order to keep things straight, it helps to have a reference source that everything looks to, to make sure that it is in sync with the rest of the equipment in your arsenal.
This is where the word clock comes in handy.
You can send the word out to another device from your audio interface. This basically keep everything in line and in time with what the audio interface is doing.
Sometimes in larger facilities, they will have an external clock that is much more precise, and every piece of gear references that source.
They all pull their timing from that word clock to keep everything working together in wonderful, harmonious bliss.
ADAT/Lightpipe/TOS link
I’m lumping these all together, because they are basically the same thing with a different name.
The outputs and inputs via ADAT allow you to bring in extra channels of audio. Or you can send out line outputs via your interface.
The more common approach is to have another piece of gear, like an 8 channel mic preamp, and input that directly into your audio interface via the ADAT Input.
You can see an example of this kind of output on a piece of gear like the Presonus DP88.
ADAT out from the audio interface is sending out up to 8 channels of audio through an external piece of equipment. That external piece of equipment has the D/A convertors to translate it into a line level signal.
If that’s the route that you are trying to go, just understand that it is less common.
Most people are trying to bring other channels into their audio interface. This is expanding your audio interface with 8 additional inputs.
One piece of gear that does have that kind of functionality is the XX
CONCLUSION
So that wraps up the audio interface outputs explained challenge!
If you want to learn more about audio interfaces, then you should check out the article all about audio interfaces.
OR if you are interested in learning about how I use FL Studio to create songs, you can check out the free course below.
Thanks!
[thrive_leads id=’679′]