
Gating noise is an important feature to figure out in your DAW.
So let’s look at FL Studio to see what the options are for a noise gate.
FL Studio has a noise gate built into three of plugins: Fruity Limiter, Maximus, and Edison. The Fruity Limiter has a noise gate section on the bottom right side of the plugin with knobs to control Release, Gain, and Threshold. Maximus has two presets available (Gate and Gate Mid). Edison has an option for setting the noise threshold on the right side of the plugin. Each plugin allows you to gate the noise in a different way, which we’ll go over a little more in depth.
Working with each plugin has some nuances, so let’s start with Fruity Limiter.
Fruity Limiter’s Noise Gate
Fruity Limiter is a pretty versatile plugin inside FL Studio.
I think it’s greatest strength is using it as a compressor, especially for me, since I am such a visual person, and the interface for compression makes sense to me from a visual standpoint.
But it also has the ability to operate as a noise gate for the audio that you want or need to process.
On the right side of the plugin is a set of three knobs that make up the functioning of the gate.
There is Rel, Gain, and Thres.
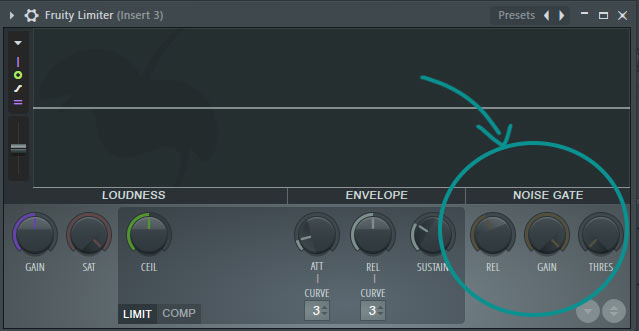
Rel is short for release, and it controls how long the gate stays open after the signal has come through that you want. Gain is how much of the gating effect you want applied to the signal you are processing. And Thres is the threshold, or the point at which you want the gate to start working.
So let me give you a visual picture of how this operates.
I want you to picture a group of ducks floating down a stream. The ducks represent the audio that you want to keep. The water, the stream, represents the noise.
The ducks are floating in the noise. Most of the duck is out of the water, but there is some parts of the duck that are sitting below the water, or the noise.
Down this stream, you set a little dock that is floating on the water. The intention of this dock is to get the ducks out of the water. It’s floating right above the water level, not too far up that the ducks won’t be able to get on it. This is the noise gate.
You are trying to set the level of the noise gate just above the water line (noise floor). This is what is called setting the threshold.
As the ducks float down towards the dock, they can climb on to the dock. When they do this, some of the water gets on the dock, and it bobs a little bit in the water, meaning some of the water will still get onto the surface.
That’s what your noise gate is doing. You are trying to capture the audio with the least amount of noise (i.e. get the ducks on the dock with the least amount of water).
The dock will bob down into the water as the ducks crawl on it, and then it will pop back up and sit above the water as the ducks get onto the dock. The speed at which the dock pops back up above the water line you can think of as the release time for the gate. If it takes the dock a long time to pop back up, that’s like a long release time, meaning potentially more noise will get through. If it pops up quickly, that’s like a short release time, meaning the least amount of noise will get through.
But sometimes if the release is too quick, it can cut off some of the vocal. So you have to balance the release time to be fast, but not so fast that you get an unnatural sounding vocal.
I know that’s a weird analogy, but I’m such a visual person that it helps me think about what I’m trying to accomplish with a noise gate.
Hope that helps you out.
Next up let’s talk about another tool in FL Studio, called Maximus.
Noise Gate Options in Maximus
Using the gate function in Maximus is not the most straightforward thing.
There is a preset that is available from the drop down menu of presets in Maximus called gate. When you select it, you will see that it brings up a setting that is applied to the master channel.
But you have to dial in the settings.
There is a tutorial that is available on the FL Studio website that tries to walk you through how to dial in the gate setting correctly. But it requires you to download a file, and then tweak settings on Maximus, etc.
So I will try to walk you through how to dial in the settings more manually and a bit more straightforward.
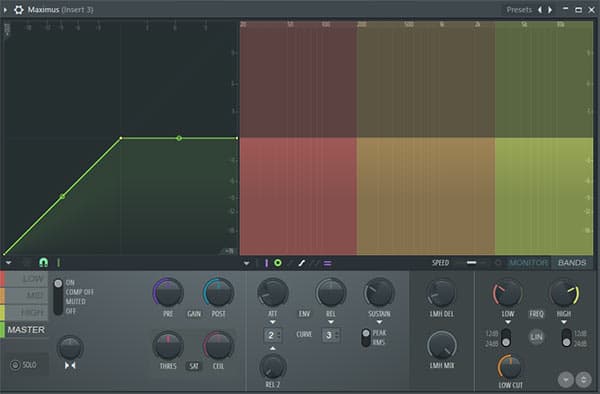
When you load up Maximus, you will see the default setting on the master channel that looks like this:
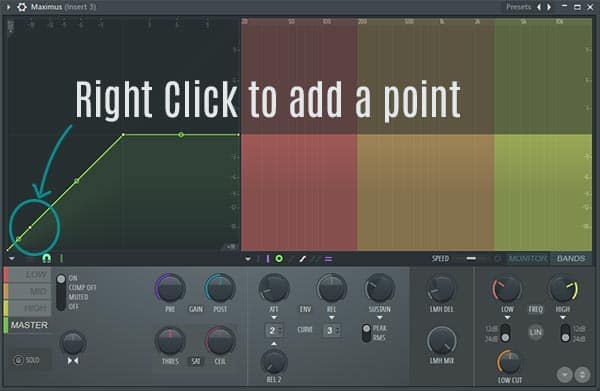
You want to move down towards the bottom of the sloped line and create a point by right clicking on the line. The point should look like this:
Then right click on the point you just created and select Hold from the menu.
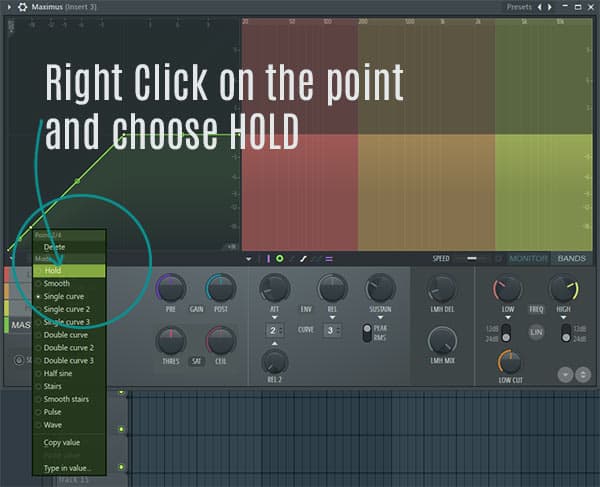
This will create a cliff that looks like this.
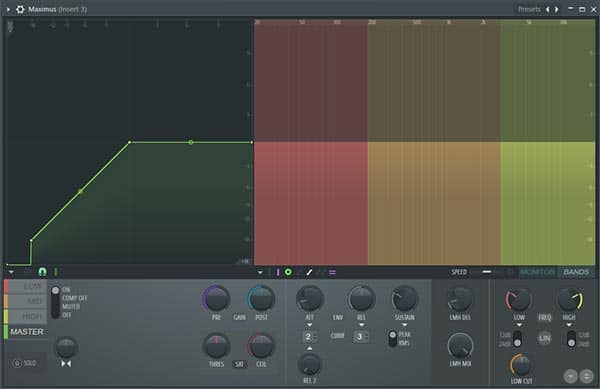
What this does is tell Maximus: “Hey, when you the sound I’m putting through you hits this level, I want you to drop it immediately. Cut it off, so it’s not a part of the track anymore.”
And then you have to listen to the track to figure out where that noise threshold level is in your recording. Then you can adjust the release knob to tell Maximus how quickly you want it to shut the gate once the good sound has gone through.
So that’s how you can do noise gating in the Maximus plugin.
The last plugin on deck is Edison.
Using Edison as a Noise Gate
I did not realize that Edison had a noise gate built into it until a few weeks ago (and I’ve been using FL Studio for over a decade). And when I did find out about it, it kind of blew my mind how simple it can be to set up.
So when you open up Edison, let’s say with a pre-recorded vocal part, you may see that there is a section that is already highlighted in green. This green section is what Edison has pre-determined to be the noise that is part of the recording that you have opened up.
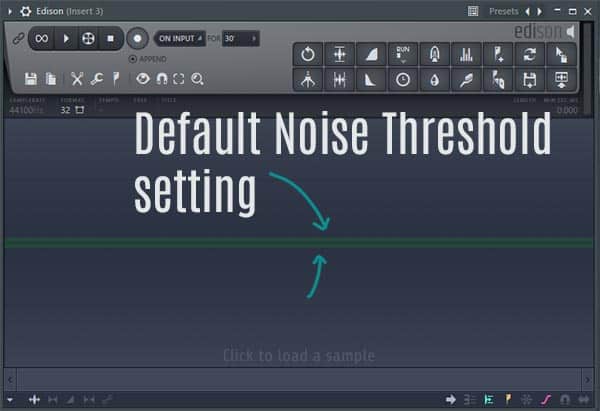
If you look at the top right section of edison, you’ll see what looks like the same meter that you find in the mixer channels in the mixer window. Now here’s the crazy part.
If you left click and drag up or down on that meter, you can very quickly adjust the level for the noise gate.
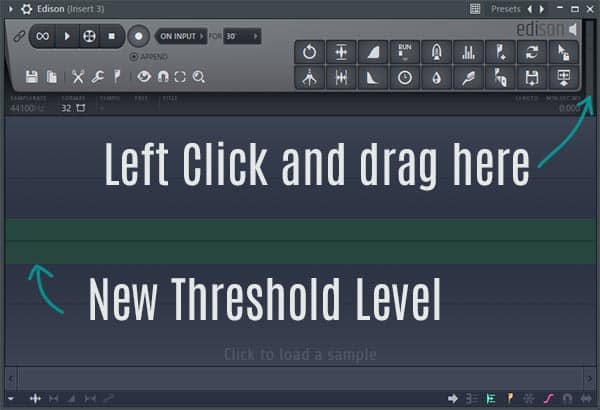
What this means is that anything that falls below the green level that you have designated can be treated as noise by the plugin. Once you have created the threshold level that you want to be gated, you go the tools menu (the wrench icon) and select GATE NOISE.
There are also a few other options for how you can treat the noise in Edison, such as trim side noise, and trim all noise and slice up, which we can cover in a different article if that would be interesting to you.
CONCLUSION
So there you have it. Three different approaches and tools that you can use to create a noise gate with the recordings that you have done in FL Studio.
For me, most of the time I’m using a noise gate on Vocal recordings. And there are some things that you can do when you are recording vocals to try to cut down on the noise that you have, when you do record.
Noise gates can be a part of the process of mixing vocals, and if you want a cheatsheet that can help you with mixing vocals, make sure to sign up to grab a completely FREE copy of a vocal mixing cheatsheet to help you get started.