Have you ever seen one of the videos from Chill Nation? And thought to yourself, those are pretty cool videos. I wonder how they make them?
Did you know that FL Studio has a built in plugin, ZGameEditor Visualizer, that can make videos that are similar?
I have always loved the workflow and capability of FL Studio, but when I found out you can make YouTube videos inside FL Studio as well, my love went to a whole new level.
I’m going to show you how you can create a video similar to the Chill Nation videos all with one plugin, inside of FL studio.
Let’s get to it!
STARTING POINT
I’m going to make a couple of assumptions up front before we get started.
- That you have a track that is mastered
- You are comfortable with finding or creating images
- That you are awesome, since you want to create a video yourself
Bringing in the mastered track
The first thing that you want to do is make sure that your track is mastered.
Meaning that it is at a level of commercial loudness.
Drag the track into your playlist.
I like to route the audio to the first channel on the mixer.
This gives you a chance to do some other sends that I will talk about a little later.
Then on the MASTER channel in the mixer, bring in the plugin called ZGameEditor Visualizer into your effects bank on the right.
I had no idea what this plugin was or what it did. But I saw this brief video from FL Studio Guru on the plugin a while back.
I’m going to break down what he showed.
OPEN UP THE ZGAMEEDITOR PLUGIN
So in the ZGameEditor plugin, there is a tab called MAIN.
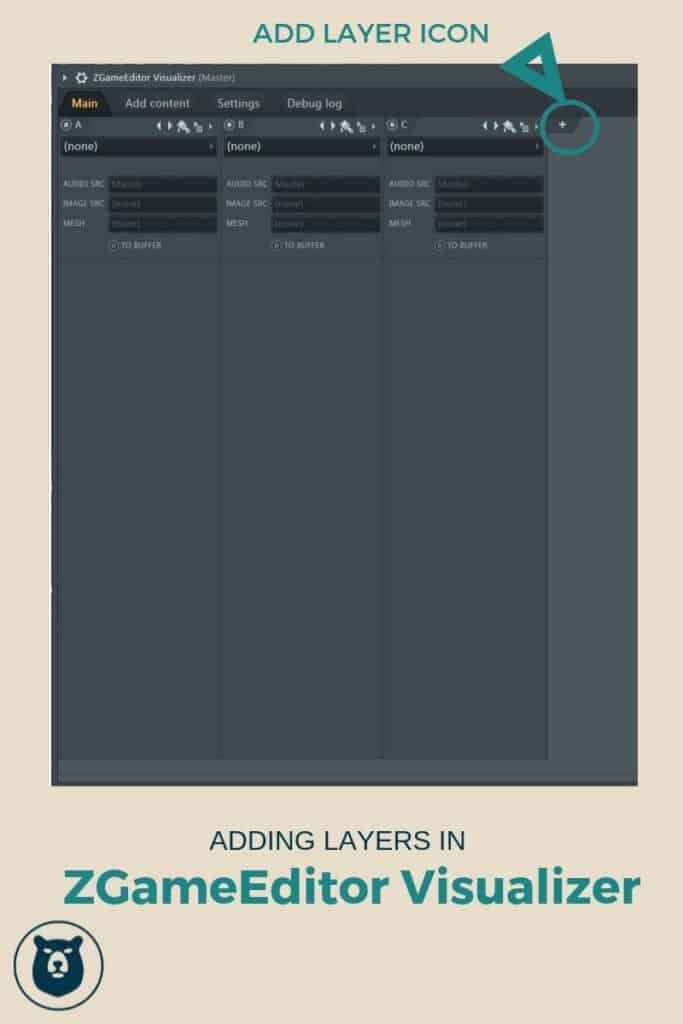
When you open it up there a smaller window below it labeled A, this is a layer.
We are going to build up a couple of layers to create the video.
CREATE SOME LAYERS

So click on the + button next to the A layer.
This will create a new layer B. Click the Plus Button again to create layer C, and again to create layer D.
Now we have 4 layers to work with.
The way this works is that the layer on the left side is the bottom layer, and then everything else stacks on top of that.
So layer D is at the top. Layer A is at the bottom.
You can move the layers around if you want by clicking on the icon that looks like an arrow and paper. Click and drag the layer where you want. Release it. The layer should be moved where you want it.
GATHERING UP THE IMAGES
In order to put the video together you need a couple of images.
For this example, I’m going to use a background image and simple logo PNG.
Background Image
So the ZGameEditor Visualizer plugin uses layers of images and effects to create a video that you can export and use on whatever platform you want. They have a couple of presets for YouTube videos, which I think is probably the most common way to use it.
I’m going to show you how to set up for 1080p video for YouTube, but you could use a similar process for another video platform, like an Instagram story, or Facebook, etc.
Since the plugin works in layers we need to bring in or create the background layer first.
I’m going to make this layer 1920×1080, since this is the resolution of a 1080p video.
For the background image, I want it to be fairly simple image, either a plain color background, or something that isn’t very busy. Meaning that as I put other layers on top of this layer, the background won’t distract from the other layers that are on top.
You can use an online tool like Canva to create these as well.
Once you have found a background image, let’s move onto to the top layer image.
PNG Layer on Top
For the top layer I want to make sure that it is still the 1920×1080 size, but I want a majority of the layer to be transparent, which is why I use a PNG. This allows you to export an image with transparency.
That’s super important to make this work.
I generally like to use one object, or smaller focus point.
In the videos like chill nation, they have their logo as the top image.
We’ll be using an example logo like that.
This focus point is where I will layer some other effects behind, to help give the video a little more movement than just being a static image through the whole song.
I like to use Photoshop or GIMP to create these images logo images.
Just remember to export the file as a PNG. Because you want everything around that object to be transparent, so you can still see the background image and the effects behind this image.
IMPORTING THE IMAGES INTO ZGAMEEDITOR
Add Images to Content
Click on the add content tab at the top of the window.
Click on the images button below that.
Here you can add pictures, videos, html, text, etc.
For this example we are going to add a few images.
Click ADD PICTURES, and a dialog box should open up.
Navigate to where you saved the picture for the background and the transparent logo and load it up.
Now you should have the two images that you created or saved loaded into the content library.
SETUP THE IMAGE FOR LAYER A
Go back to the MAIN tab, Click on layer A.
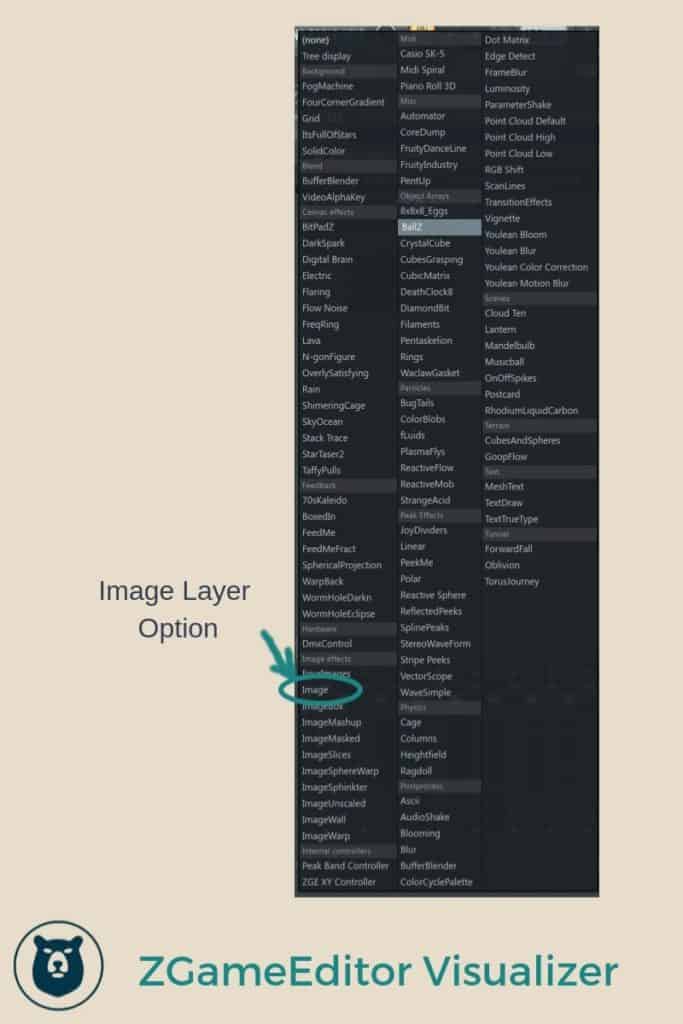
Click the drop down button that currently says (none).
Navigate down to the IMAGE EFFECTS section and select IMAGE.

You’ll see something that looks like a stained glass window appear, and some options will now be available.
Find the option that says IMAGE SRC.
When you click on that, a drop down menu will appear that shows the images you just loaded in the previous step.
Select the background image for Layer A.
Now let’s set the top image.
SETUP THE IMAGE FOR THE TOP LAYER
Click on Layer D
Now do the same steps that you did for the background layer.
Choose the IMAGE from the top dropdown menu.
Then select the top image from the IMAGE SRC menu.
You can mess with the position of the logo by using the X or Y parameters to get it to sit where you want.
But it should be alright.
Now let’s add some effects.
POLAR PATTERN EFFECT
Click on Layer C.
From the drop down menu, go down to PEAK EFFECTS.
Select Polar.
You may see a circle appear. If you don’t see it, you can use the X and Y to locate it.
You may not see it when you bring it in, because it is behind the Logo layer.
This effect give you spikes that react to the music as it plays.
You can adjust the appearance of it by adjusting the RADIUS, BANDS, THICKNESS, MAGNITUDE and other parameters.
NOTE: Your song has to be playing in order to see how it is reacting.
LAVA EFFECT
So next we are going to add a little bit of movement behind the logo.
Select Layer B.
From the drop down menu, go to CANVAS EFFECTS.
Select LAVA for this example. You’re background image will disappear at this point.
Don’t freak out.
We are going to make this layer more transparent by adjusting the ALPHA parameter. This way you can still see the background image that you put on Layer A.
So now we have 4 different layers.
TWEAK THE SETTINGS
I’m just giving you an example of what you can do, but there are a ton of options that you can use in ZGameEditor Visualizer.
Go through the effects, tweak the parameters until you get to something that you like.
Once you are happy with how it looks, we can move on to exporting the video.
EXPORTING THE VIDEO
Click on the EXPORT VIDEO button on the right side of the screen.
This will bring up a dialog box that asks you to name the file and choose the location you want the file to save to.
Most of the time I’ll save it to the desktop so I can work with it right after I finish exporting it.
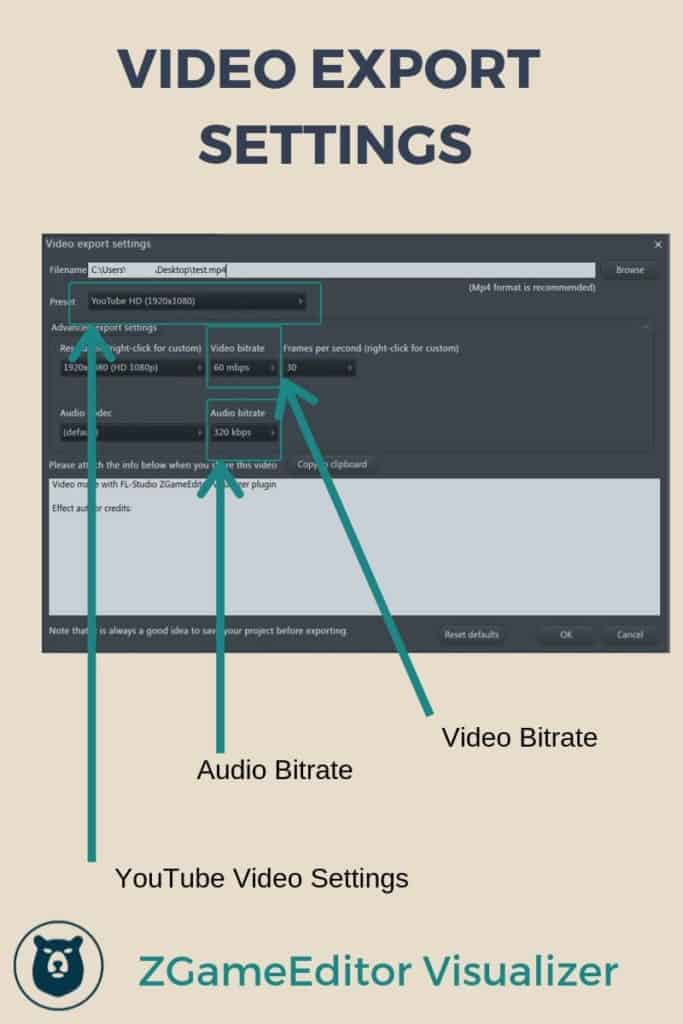
Once you click the save button another window will appear called Video Export Settings.
EXPORT SETTINGS
Under the preset drop down menu, I choose YouTube HD (1920×1080).
Then click on the ADVANCED EXPORT SETTINGS
For VIDEO BITRATE, I choose 60 mbps, and under AUDIO BITRATE I choose 320 kbps.

If you are going to share the video on YouTube, then give credit to the people who helped create the effects you are using in the video, and paste that into your video description area when you upload to YouTube.
Then click OK.
And choose START on the RENDER TO window that comes up next.
The video will start exporting at that point, and you just have to wait.
It takes a little while so be patient.
CONCLUSION
I had no idea that FL Studio had this capability until I watched the videos from Curtis King Beats and FL Studio Guru.
That is such a huge, secret weapon that FL Studio has in it’s arsenal that a lot of people probably don’t know about.
With just a little bit of work you can have a video that you can post of your music on YouTube.
