Are you struggling to figure out how to record your voice in FL Studio?
Well today I’m going to walk you through the entire process of how to record your vocals.
And I also have a cheatsheet that you can download and print out.
I can remember the first time I tried to figure out how to record vocals in FL Studio.
It seemed like some weird technical nightmare to figure out all the different buttons I had to press, and things I had to check.
All just to step up and sing a few words into a microphone.
I know it feels intimidating right now.
But I promise, once you’ve done 2-3 times, it starts to become second nature.
So let me walk you through what you have to do!
THE EQUIPMENT
So the first thing that we need to do is make sure we have all the right equipment that we need to record a vocal in FL studio.
Today I will be using a:
- Condenser Microphone that comes with a headbasket
- a pop filter
- a mic stand
- an XLR cable
- an audio interface.
I set up all these elements together so that I can get my voice from the microphone into the DAW.
Make sure that you connect everything first, before you turn on the Phantom power.
Phantom power is the thing that helps power the condenser microphone to make it work.
But if I have the phantom power on while I’m connecting everything, there is a chance that I could damage the microphone.
I don’t want to do that. You don’t want to do that.
You need to protect your investment, and make sure that you have it for the long haul.
AUDIO INTERFACE SETTINGS IN FL STUDIO
So now that everything is connected, I need to make sure that I have everything routed correctly in FL Studio so that it sees the microphone, and I can get the audio into the song that I am producing.
So I will open up FL Studio and then open up the settings window by pressing F10 on my keyboard.
When that window comes up, I will select the audio tab.
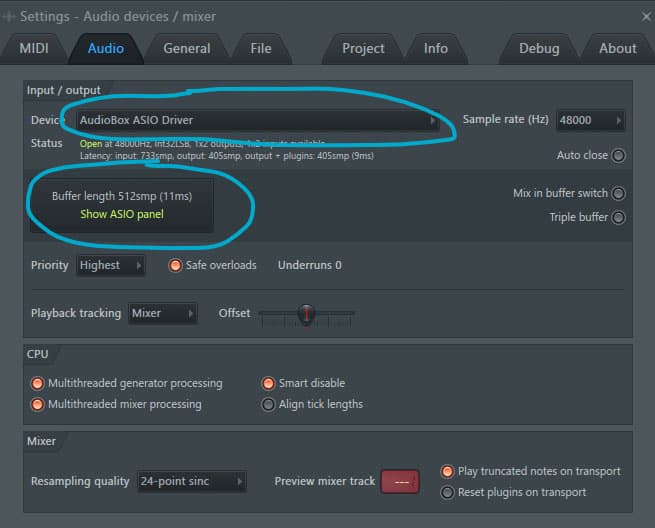
At the top of the audio tab you have the option to select the driver for the audio interface that you have plugged into your computer. The audio interface that I am using on this project is the Presonus Audiobox iTwo.
So I want to make sure that I am looking for the ASIO driver for that audio interface.
Since I am working in Windows.
The next setting that I need to check is the buffer size.
Usually when I am recording a vocal or any audio, I want to make sure that I get the buffer size as low as I can without introducing any clicks or pops into my recordings.
I usually try to be around 256 samples.
If that doesn’t work, then I’ll move up to 512 samples.
That usually works pretty well for me without introducing any strange delay that I would hear in my headphones.
RULE OF THUMB: keep buffer size low when you are recording to keep from hearing a weird delay of your voice in the headphones. You can increase the buffer size when you move into mixing, which will help you with processing lots of plugins in your mix.
SETTING UP THE MIXER TRACK
Now that we have the audio interface setup, we need to go into the mixer to make sure that we are able to get the audio into the project.
I find a blank mixer track, they are called insert tracks in FL Studio.
Go over to the right side of the window and select the drop down menu for input.
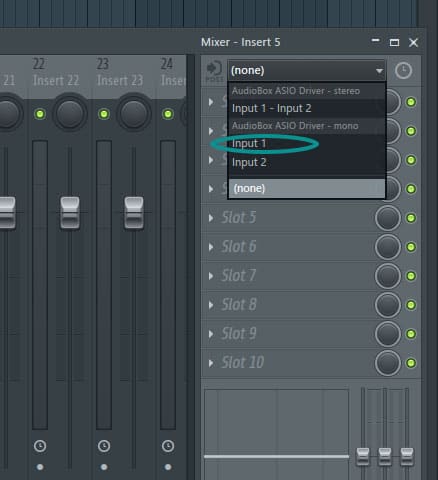
I am going to select Input 1 from the dropdown menu.
Make sure you are using the mono channel and not the stereo channel,
otherwise you will get everything showing up on the left side.
Then I need to set the gain for the vocal mic.
I do this by singing into the microphone and raising the level on the audio interface preamp,
until I see the green bars hitting somewhere in the -16 to -12 level on the meter.
This will make sure that I am getting a decent audio signal into the song
so that I can use plugins and mess with the volume later as I start mixing the song.
TIP: if you are having trouble getting enough gain out of your preamp, then you can try to add a little more by adding a fruity balance plugin to the mixer track to give you a little extra volume.
RULE OF THUMB: Look to have the meter hitting about midway up to make sure you have a good usable signal that isn’t too loud, or too soft.
The last thing you need to do in the mixer window is to pick where you want to save the audio file that you record.
You can do this by clicking on the little circle at the bottom of the mixer track you setup.
This will open up a dialog box that will ask what you want to call the file and where you want to save it.
I try to name files in a way that makes sense so that when I open the project later, I can tell at a glance what the files are.
So if I’m recording a part of the verse, then I would name it something like vox-verse1.
It just makes things easier when you use a little bit of organization up front in your projects.
Trust me, it pays off later on.
Sweet!
You have finished doing all the things that you need to do for the mixer window,
So now we can go back out to the main window and playlist area to finish getting things setup.
SETTINGS IN THE MAIN WINDOW
At the top of the program, there is a section called the transport controls.
This is the play button and the record button, etc.
Right click on the record button (1) and make sure that the option for recording audio is checked,
as well as the record starts on playback option.
And then I like to make sure that I have the countdown timer (2) turned on. This just adds a metronome countdown before the recording starts, and gives you a little extra time to get ready before you have to sing.
I may or may not also turn the metronome on, based on what stage I’m at in the song.
If I just have a rough guitar track down and am recording guide vocals,
then I will probably record with the metronome.
But if I have a pretty fleshed out song, then I might turn it off.
That’s up to you.
Then make sure that you have song mode (3) selected.
It’s right beside the play button on the left. When you click song, it will turn green.
That makes sure that you are focused on the playlist mode.
THE ACTUAL RECORDING PART
So now all the back end stuff is ready, and you can actually start to record the vocals.
Put a pair of headphones on, make sure that no sound is coming out of speakers.
You don’t want any sound bleeding into your mic while your are singing.
Make sure you check to make sure that the volume is up enough to hear the music,
but not too loud that it makes it hard to concentrate on what you have to sing.
If you don’t like to hear yourself singing, you can setup the mixer to only hear the track and not your voice.
But I think it is a good practice to get used to hearing yourself sing.
Then all you have to do is click the record button, or press R on your keyboard.
You’ll hear the metronome start to count down.
And then you are recording!
When you finish recording you can press the space bar to stop the audio,
and you will see an audio file show up in the playlist.
Congratulations! You have now done your first vocal recording in FL Studio!
CONCLUSION
Let’s go over the steps one more time.
- Setup your microphone, stand, pop filter, XLR cable and audio interface
- Turn on Phantom power after it’s all connected.
- Get the audio interface settings in FL Studio
- Setup the mixer track to record from your audio interface
- Set the gain for the mic so you get a good level
- Set where you want the audio file to be recorded and name it
- Make sure that you are set to record in the transport bar
- Record your little heart out!!
Now there are some ways that you can customize the listening experience in your headphones.
You can setup the mix to either hear yourself with some effects,
or perhaps you don’t want to hear yourself at all.
If you want a quick checklist for recording, you can download one here.
Thanks for hanging out with me, and make sure that you check out this post on how to record multiple takes of vocals and other instruments to get some ideas for putting together really good takes for your productions.